
Setting up a template for signature
A template set up for e-signature produces documents that already know who signs them and where. When a sender picks one of these documents, the signature fields are already placed and the list of signers is filled in. All that is left is to check it and send.
There are four steps, all on the E-sign tab in the Template Editor’s right-hand panel:
- Turn e-signature on and acknowledge the warning.
- Define the signer roles.
- Place the signing fields.
- Save and publish.
Your org must be set up for e-signature first. See One-time org setup.
Before you start
Section titled “Before you start”- Permissions. To turn e-signature on or off for a template, you need the
Sliick Docs AdminorSliick Docs Template Authorpermission set. Without one, the switch is greyed out and a note tells you which to ask for. - PDF output. Documents are signed as PDFs, so the template must have PDF output turned on. If it is off, the switch is disabled and the tab tells you why.
- A draft. On a designed template, work on a draft, because the published version cannot be edited. If you are looking at the live version, choose Create draft first.
- A test record. You place fields on a real preview of the document, so choose a test record in the editor’s top bar first.
Step 1: Turn e-signature on
Section titled “Step 1: Turn e-signature on”- On the E-sign tab, switch on Enable e-signature for this template.
- A Before you enable panel opens. It warns about documents that are excluded from, or restricted for, electronic signing, such as wills, court documents and notarised documents.
- Read it, choose Agree, then choose Enable.
The tab now shows E-signature enabled, with who acknowledged the warning, the warning version, and the date.
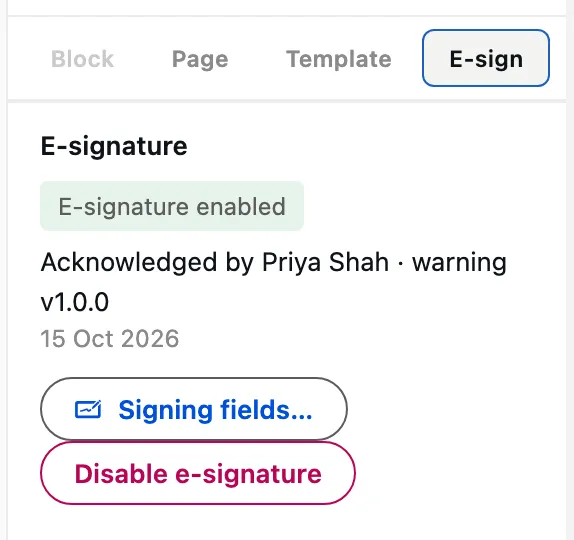
That acknowledgment is saved on the template and copied onto every signature request sent from it. If the standard warning is updated later, the tab asks you to acknowledge the new version. If the update adds a new excluded type of document, you must acknowledge it before you carry on. A wording-only change shows a banner you can deal with when it suits you. To use your organisation’s own wording, see Consent and sender wording.
Disable e-signature turns it off again. The earlier acknowledgment is kept for the record, and turning it back on asks you to agree to the warning again.
Step 2: Define the signer roles
Section titled “Step 2: Define the signer roles”Choose Signing fields… to open the field designer. The document preview is on the left and the Signer roles panel is on the right.
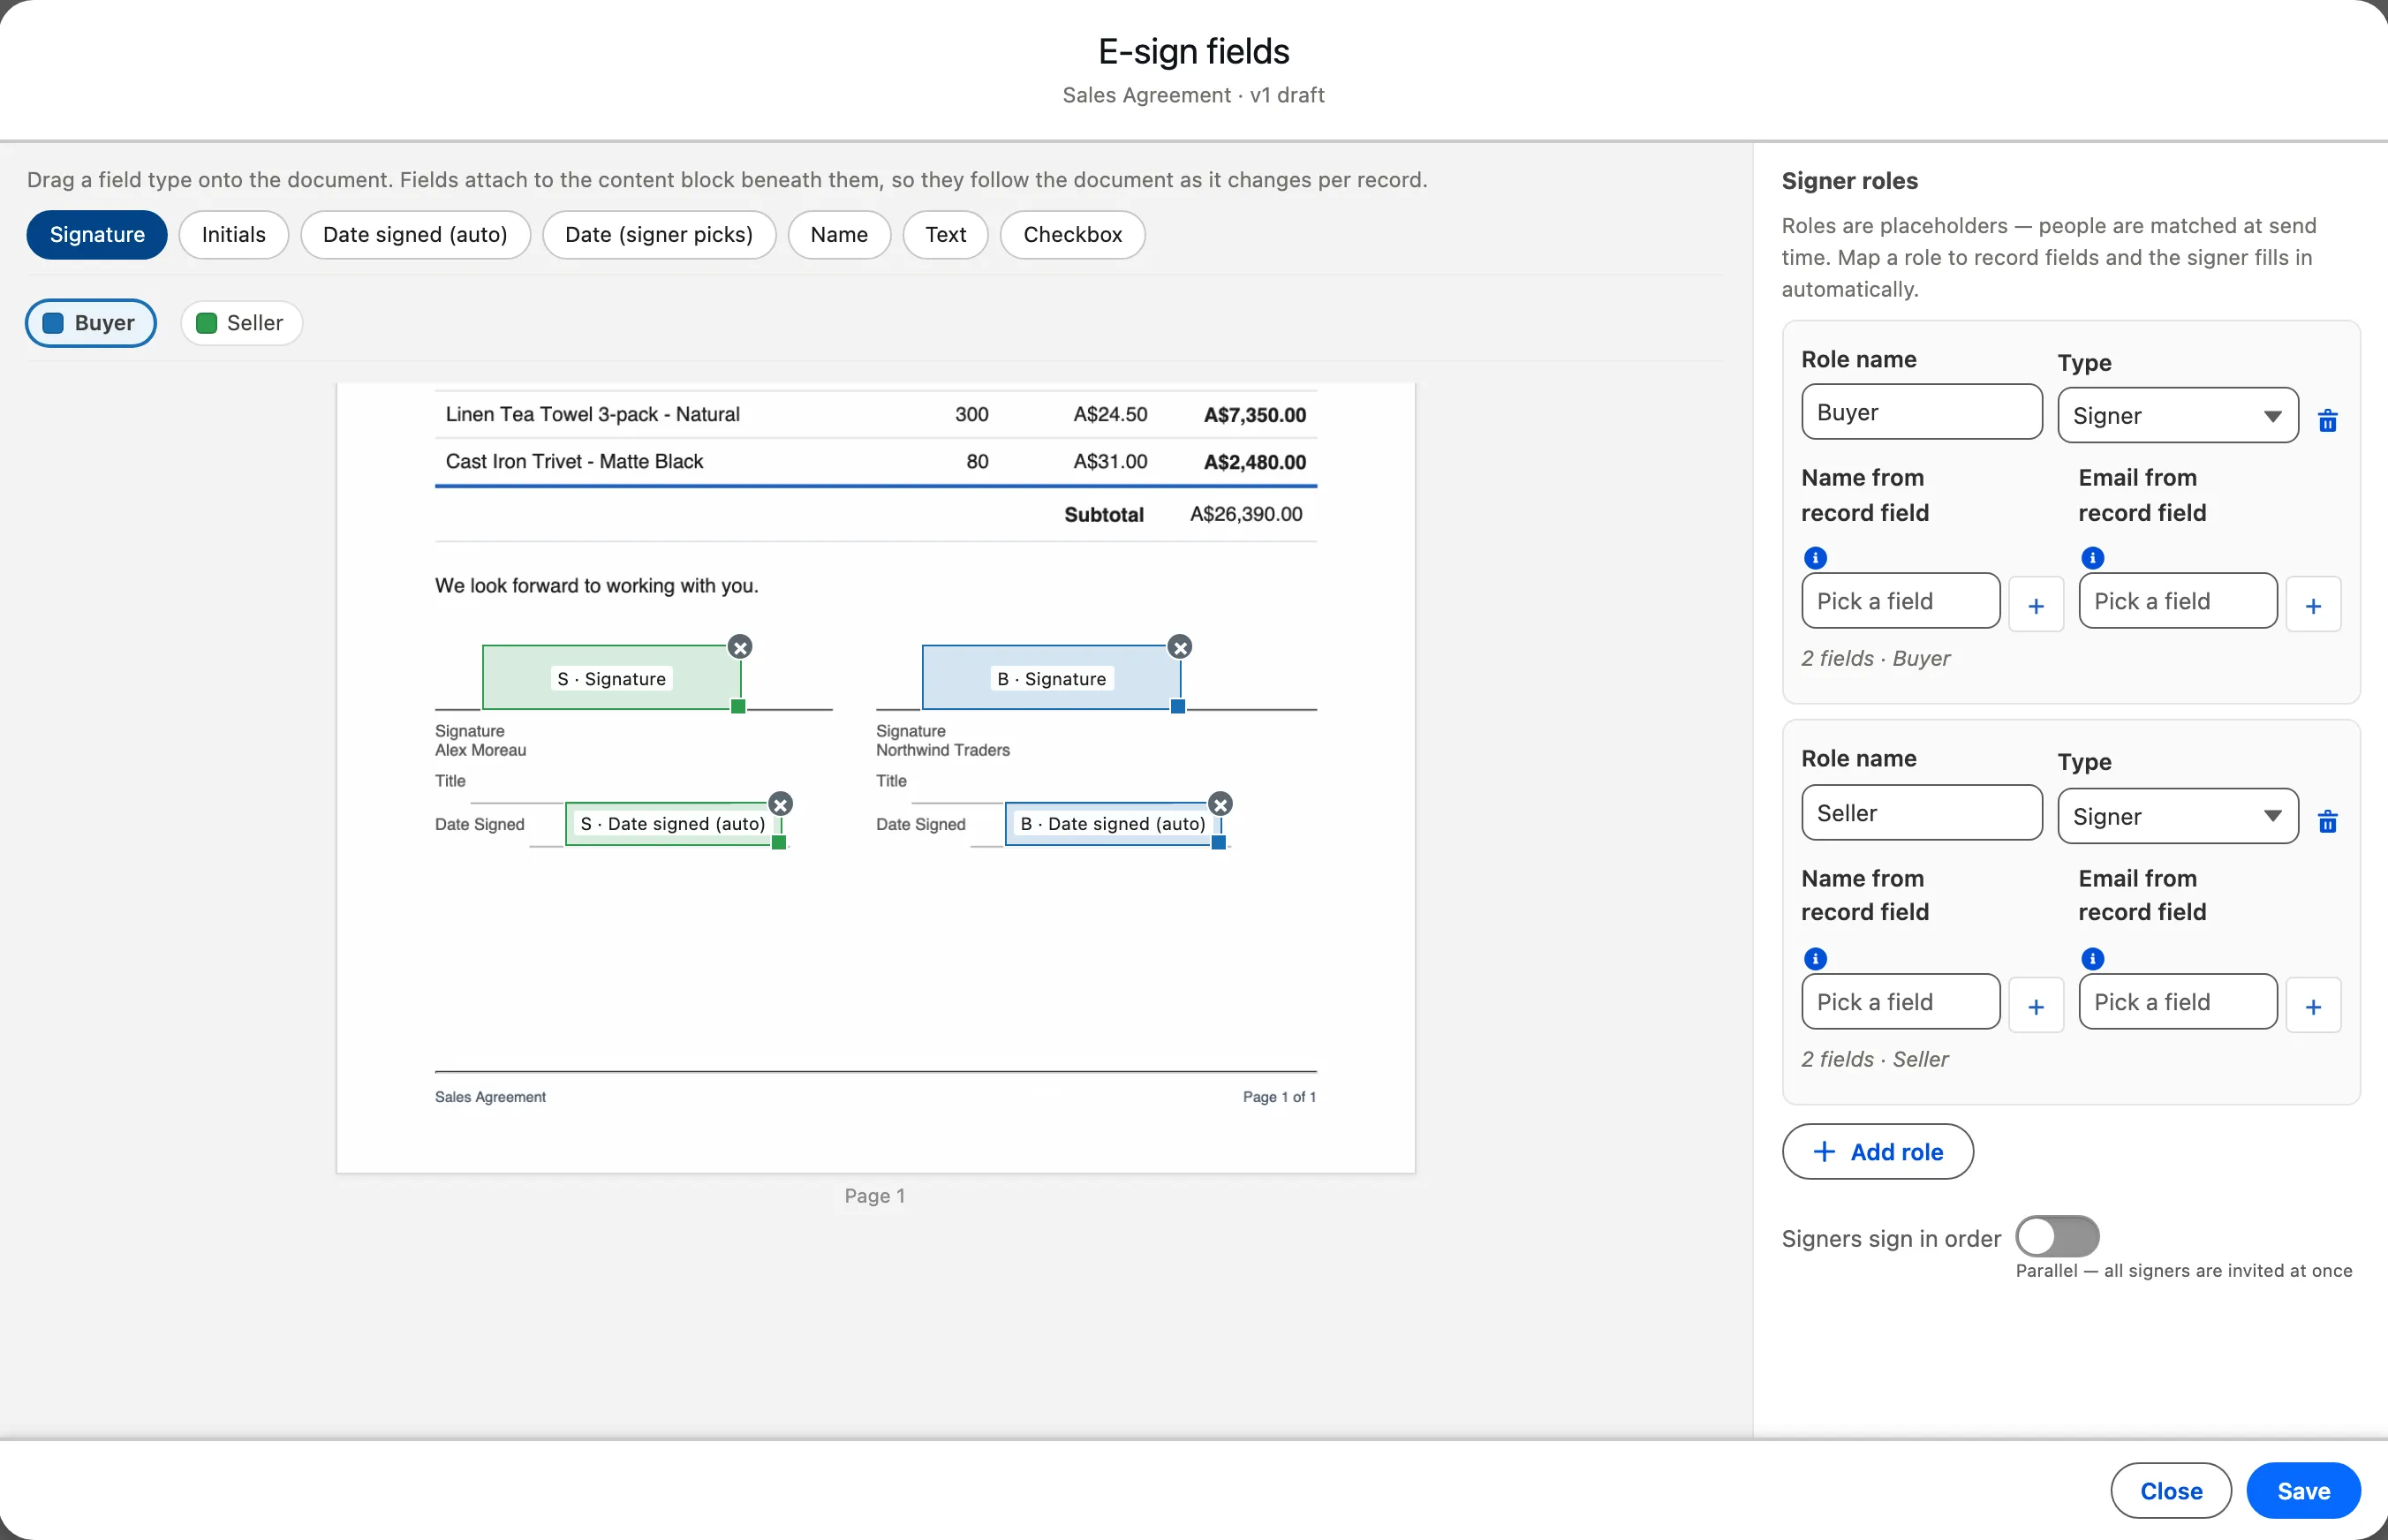
A role stands in for a person, such as Buyer, Tenant or Account Manager. Real people are matched to roles when the document is sent, so one template works for every record.
Choose Add role for each person, and set:
| Setting | What it does |
|---|---|
| Role name | What the sender sees in the list of signers, for example Buyer. Up to 80 characters, and each name must be different. |
| Type | Signer signs the document. CC (receives completed document) gets a copy of the signed document but does not sign, so a CC role cannot have fields. |
| Name from record field | Optional. The field that supplies this person’s name when the document is sent. Choose + to browse fields, including fields on related records such as Contact.Name or Owner.Name. Leave it blank and the sender types the name. |
| Email from record field | Optional. The field that supplies this person’s email address, such as Contact.Email or Owner.Email. |
The field picker only offers fields that make sense: an email or text field for the email, and anything except an ID or lookup for the name. So you pick Contact.Email, not the Contact lookup itself.
When the sender opens the send screen, these roles arrive with the name and email already filled in from the record. If the field is empty on that record, or the sender cannot see it, the sender types it in.
Signing order. Signers sign in order controls how invitations go out. On: each signer is invited after the one before signs, in the order the roles are listed. Off: everyone is invited at once. The sender can still change this before sending.
A template can have up to 10 roles, counting signers and CC recipients together. A signer role with no fields is fine: that person is added to the list and the sender places their fields.
Step 3: Place the signing fields
Section titled “Step 3: Place the signing fields”Drag a field type from the palette onto the page, or click a field type and then click the page.
| Field | What the signer does |
|---|---|
| Signature | Signs here. |
| Initials | Initials here. |
| Date signed (auto) | Nothing. It is filled in with the date the document is signed, and the signer cannot change it. |
| Date (signer picks) | Chooses a date, such as a start date or a date of birth. This is not the date they signed. |
| Name | Nothing. It is filled in with the signer’s name. |
| Text | Types into a free-text box. |
| Checkbox | Ticks a box. |
New fields go to the active signer, which you pick from the colour-coded legend. Each signer’s fields share their colour. If there are no roles yet, your first field creates Signer 1. Rename it to match who actually signs.
Select a placed field to give it a Label (the signer sees this) and to set Required (on by default). Drag a field to move it, drag the corner handle to resize it, and choose × to remove it. You cannot change which signer a field belongs to once it is placed. To give it to someone else, remove it and place it again.
Fields move with the content. Each field is attached to the part of the document beneath it. If a record produces a longer table or an extra paragraph, the field moves with that content instead of landing on the wrong line. Two places need care:
- Inside a repeating section (one that repeats for each related record) is not allowed, because the field would appear once per record. Place it outside. You cannot publish until you do.
- Inside a conditional section is allowed, in either the main part or the else part. If that part is left out for a record, so are its fields. If all of a signer’s fields are left out, that signer is dropped from the list for that record.
If you delete a block that has signing fields on it, the editor warns you first. If you delete it anyway, the next time you open Signing fields… you are told which fields lost their place, by signer and field type (for example Buyer · Date (signer picks)), so you can place them again.
Removing a role, or changing it to CC, removes its fields too. You are asked to confirm first and told how many fields will go.
Amount fields cannot be placed on a template. The sender can add them in the send screen before sending.
Step 4: Save and publish
Section titled “Step 4: Save and publish”Choose Save in the field designer. Your roles and fields are saved to the template’s draft. Senders do not get them yet. If you choose Close with unsaved changes, you are asked before they are thrown away.
Saving always works, even if something needs fixing. Problems such as a duplicate role name, or a field whose block has been deleted, are listed as Warnings. You must fix them before you can publish.
Then proof and publish the template as usual. See Proof, publish and versions. Publishing is what makes the signature setup live: documents generated from then on carry their field placement with them.
When you create a new draft from a published template, its signature setup comes with it, so you only change what is new.
What senders see
Section titled “What senders see”When a sender picks a document generated from the template, it opens with the fields placed and the roles listed, filled in from the record where you linked a field. The document they picked is exactly the document that gets signed. The template tab in the send screen also lists the template, with a hint saying whether its fields will be placed automatically. See Sending a document.
Each document remembers which published version of the template it came from. An older document keeps its original field placement, even after you change the template.
Documents generated before you published have no placement, so the sender places the fields by hand. Generate the document again to get automatic placement. If a document’s placement no longer matches its template version, for example because it was generated before a change to the signature setup, nothing is placed and the sender is told why. A half-placed document is never shown as complete.
Word-file templates
Section titled “Word-file templates”A template uploaded as a Word file has the same E-sign tab and the same enable step, but no field designer. Instead, type signature tags into the Word document where each field belongs, for example {{@Signature:Buyer:1:Signature}}. They are read from the generated PDF when it is sent. A Word template without tags still works: the sender places the fields by hand. See Signature tags for the format.
Troubleshooting template setup
Section titled “Troubleshooting template setup”| What you see | What to do |
|---|---|
| The switch is disabled, with a note about PDF output | Turn on PDF output for the template. On a Word template, proof and publish a draft first so PDF output becomes available. |
| The switch is greyed out, with a note about permission sets | You need the Sliick Docs Admin or Sliick Docs Template Author permission set. Ask your Salesforce admin. |
| Signing fields… is disabled | Choose a test record in the editor’s top bar. On a designed template, also check you are on a draft. |
| The designer asks you to fix validation issues | Fix the problems the editor lists for the document, save, and open the designer again. |
| Recent changes to the document do not show in the designer | The designer shows the saved draft. Save the template, then reopen it. |
| Publish says a field’s block no longer exists | The block that field sat on was deleted. The message names the field by signer and type. Open Signing fields…, place it again, and save. |
| Save warns about a role’s name or email source | The field you chose cannot supply a name or email address, for example a lookup. Pick the field itself, such as Contact.Email. |
| Publish says a field is inside a repeating block | Move the field outside the repeating section and save. |
| Senders have to place every field by hand | Check the template has been published since you placed the fields, then generate the document again. |
| The sender is told none of the record’s templates is set up for e-signature | E-signature is not turned on for the template, or its published version does not produce a PDF. |
For problems after a request has been sent, see Troubleshooting.