
Org setup for admins
This page is for Salesforce admins. Template authors can skip it: once it is done, they only enter the org address, as in Connect to Salesforce.
There are two required steps, done once per org:
- Install the Sliick Docs package and assign authors the right permission set.
- Turn on Enable CORS for OAuth endpoints in Setup.
That is all. The package includes its own External Client App, so there is nothing to create and no consumer key to hand out. Do this in every org authors connect to: a sandbox and production are set up separately.
Step 1: Install the package and assign the permission set
Section titled “Step 1: Install the package and assign the permission set”The add-in works through the Sliick Docs package, so it cannot do anything until the package is installed. See Install and permission sets. Installing the package also:
- adds
https://office.sliick.com, the add-in’s address, to your org’s CORS allowed origins list; and - installs the Sliick Docs Integration External Client App, which the add-in signs in through by default.
Assign authors Sliick Docs Template Author (or Sliick Docs Admin for the people who own document policy).
Watch out for Sliick Docs User: it can generate documents but cannot save templates. An author with only that permission set can browse every object and field and build a complete template, and is stopped only when they click Save. The pane explains why, but it saves everyone time to assign the right permission set up front.
Step 2: Enable CORS for OAuth endpoints
Section titled “Step 2: Enable CORS for OAuth endpoints”This is the step most often missed, and the package cannot do it for you.
The add-in signs in from Word straight to your org. For that to work, your org has to let its sign-in (OAuth) pages answer requests from the add-in’s web address. The Salesforce setting for this is Enable CORS for OAuth endpoints. It is off in a new org, and only an admin can turn it on.
- In Setup, search for and open CORS.
- Click Edit and tick Enable CORS for OAuth endpoints.
- Click Save.
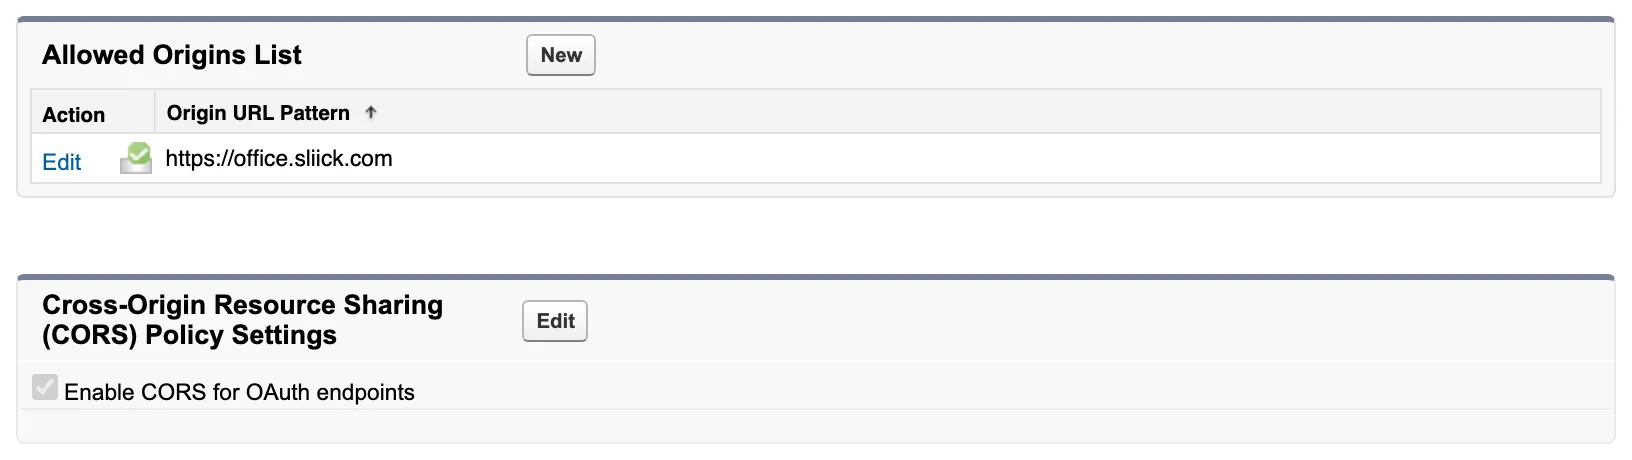
Then check (you should not need to add it): on the same page, the Allowed Origins List should already contain https://office.sliick.com, because the package adds it. If it is missing, click New and add exactly this, with no path and no trailing slash:
https://office.sliick.comWhat it looks like when this step is missing: the author enters the org address, the Salesforce login window opens, they sign in and approve access, and then the pane says “Can’t reach Salesforce.” The login worked, but the org blocked the last step. Tick the box and ask the author to try again. Nothing else needs to change.
Note: this step is needed whichever app the add-in signs in through, including your own External Client App (see the optional step below). Turning it on when it is already on does no harm, so if you are unsure, check it.
Recommended: review the app’s policies
Section titled “Recommended: review the app’s policies”The packaged app comes with sensible defaults, and you stay in control of it. In Setup, open External Client App Manager, then Sliick Docs Integration, then Policies. These policies apply to this app only. They do not change your org-wide login policy.
- Permitted Users. All users may self-authorize lets any licensed author connect. If you choose Admin approved users are pre-authorized instead, also assign a permission set or profile to the authors who should connect. Until you do, their sign-in is refused.
- IP Relaxation. Set it to Relax IP restrictions, and leave the refresh token IP allowlist and IP enforcement options off for this app. Authors sign in from wherever they work, so the sign-in can come from any IP address. If IP restrictions are enforced, Salesforce blocks it with “ip restricted by app developer”. Authors still sign in through the standard Salesforce login.
This is also where you can remove the add-in’s access to the org completely, if you ever need to.
Tell your authors to connect
Section titled “Tell your authors to connect”There is nothing to send out. Authors open the add-in, choose Connect to Salesforce, enter your org’s My Domain address (for example https://yourcompany.my.salesforce.com), and sign in as themselves. They only see the objects and fields their own Salesforce permissions allow.
The address is remembered by the copy of Word it was entered in, so it is entered once per computer, not once per person. An author who uses both Word on the web and Word on the desktop enters it in each.
Optional: use your org’s own External Client App
Section titled “Optional: use your org’s own External Client App”Skip this unless your org’s policy requires connections to go through an app you created yourself. The packaged app covers the normal case.
In Setup, open External Client App Manager and click New External Client App (in older orgs, App Manager and New Connected App). Set:
- Basic information
- Name:
Sliick Office Add-in, or anything you like - Contact email: your admin email
- Distribution state: Local
- Name:
- OAuth settings: tick Enable OAuth, then
- Callback URL:
https://office.sliick.com/auth-callback.html - OAuth scopes: both Manage user data via APIs (
api) and Perform requests at any time (refresh_token,offline_access) - Require Proof Key for Code Exchange (PKCE): on
- Require secret for Web Server Flow: off
- Require secret for Refresh Token Flow: off
- Callback URL:
Paste the callback URL exactly, including
.html. Salesforce must match it character for character. Without the.html, sign-in fails before the login window returns.
Both Require secret boxes must be off, because the add-in has no secret to send. If either is on, sign-in fails with “invalid_client: invalid client credentials”.
Save the app. Salesforce creates a Consumer Key. Set the app’s policies as described above, then give the key to your authors. In the add-in, they open ⚙ Settings, then Advanced, and paste it into External Client App consumer key. The consumer key is not a secret, so it is safe to share. Leaving the box blank uses the packaged app.
Enable CORS for OAuth endpoints (Step 2) is still required when you use your own app.